★ FREE SHIPPING! Orders over $25 in USA ★
Popular Products


Rear Diffuser Middle Section Pin-stripe Pre-cut Overlay for 2025+ K4 GT-Line Sedan Only - Red
Rear pre-cut pin-stripe overlay for the middle section of your 2025+ K4 GT-Line rear diffuser. Peel-and-stick application transforms your diffuser with minimal effort or accentuates the lines you want defined. Durable vinyl withstands 5–7 years of weather exposure. Available in multiple colors to match...
No reviews
- From $25.00
- From $25.00
- Unit price
- / per
-
Red
-
Matte Black
-
Dark Red
-
Blue
- Azure BlueSky BlueMIntGreenLime GreenPurpleLavenderHot PinkSoft PinkYellowDark YellowGolden YellowLight OrangeNardo GreyDark GreyWhiteMatte WhiteFluorescent YellowFluorescent GreenFluorescent PinkRainbow HoloRose GoldChrome SilverCarbon FiberGloss Carbon


Rear Diffuser Pin-stripe Pre-cut Overlay for 2025+ K4 GT-Line Sedan Only - Red
A simple diffuser pin-stripe pre-cut overlay for your 2025+ K4 GT-line is a change that makes all the difference on your rear diffuser. Choose from multiple colors that make your rear stand out. Easy to install, just line it up and stick. Subtle yet...
No reviews
- From $15.00
- From $15.00
- Unit price
- / per
-
Red
-
Gloss Black
-
Matte Black
-
Dark Red
- BlueAzure BlueMintGreenLime GreenPurpleLavenderHot PinkSoft PInkYellowDark YellowGolden YellowLight OrangeNardo GreyDark GreyWhiteMatte WhiteFluorescent YellowFluorescent GreenFluorescent PinkRainbow HoloBlue OpalChrome Rose GoldChrome SilverCarbon FiberGloss Carbon


AFDOverlays Seat Logo Pre-cut Overlay Tint for 2024+ Elantra N
Accentuate your Elantra N's interior seats with custom pre-cut seat logo overlays that transform your cockpit instantly. Choose from multiple shades, each designed to complement your vehicle's aesthetic and make your cabin stand out. Installation is effortless: simply peel and stick. Upgrade your driving...
No reviews
- $22.00
- $22.00
- Unit price
- / per
Got Questions?
Email us!


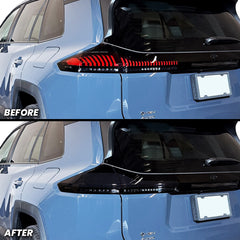
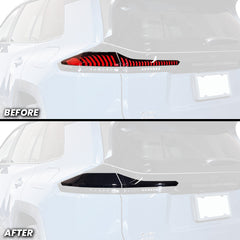
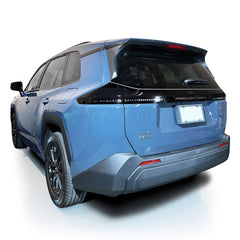
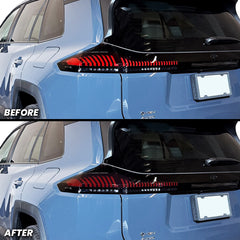

Rear Tail Light Brake Light and Running Brake Light Pre-cut Overlay Tint for 2026+ RAV4
No reviews
- $51.00
- $51.00
- Unit price
- / per
Hurry up! only -3 left
Couldn't load pickup availability
Free Shipping
Free standard shipping on orders over $25 USA Domestic
Free shipping on orders over $100 for international
Free Returns
Learn More.
You may return most new, unopened items within 30 days of delivery for a full refund. We'll also pay the return shipping costs if the return is a result of our error (you received an incorrect or defective item, etc.).
You should expect to receive your refund within four weeks of giving your package to the return shipper, however, in many cases you will receive a refund more quickly. This time period includes the transit time for us to receive your return from the shipper (5 to 10 business days), the time it takes us to process your return once we receive it (3 to 5 business days), and the time it takes your bank to process our refund request (5 to 10 business days).
If you need to return an item, simply login to your account, view the order using the "Complete Orders" link under the My Account menu and click the Return Item(s) button. We'll notify you via e-mail of your refund once we've received and processed the returned item.

Transform your 2026+ RAV4's rear end into an aggressive statement with our pre-cut tail light overlays. Choose between a full dark smoked look for maximum impact or a lightly smoked finish that softens the bright red while maintaining visibility when not lit. Both styles feature air-release technology for hassle-free installation. No special tools required. Your brake lights stay brilliantly visible when lit, ensuring safety without sacrificing style. Match your car's desired aesthetic and elevate your vehicle's presence on the road.
🔧 Specifications:
- Fitment: For 2026+ Toyota RAV4
- High-Quality Material: Can withstand all kinds of weather (5 - 7 Year Durability)
- Easy Application (Peel and Stick)
- Nano air-release technology material for ease of installation
- Comes in 8 pieces
- 2 x Driver Side Brake light / Running Brake light
- 1 x Driver Side Brake Light Signal Bump
- 1 x Driver Side Rear Tail Light Reflector
- 2 x Passenger Brake light / Running Brake light
- 1 x Passenger Brake Light Signal Bump
- 1 x Passenger Side Rear Tail Light Reflector
- 2 x Driver Side Brake light / Running Brake light
- ** NOTE ** This product is a VINYL STICKER OVERLAY that tints your brake light/turn signal light, transforming it into a sleeker and more aggressive finish, hiding the red. Allowing light to pass through even through the smoked finish. Giving your rear a unique and one of a kind apperance.
🛠️How to Install:
For Best Results
Tools Needed: Heat gun or blow dryer, padded glove or felt-tip squeegee
**Professional Installation Recommended, but not required**
Step-by-Step Installation:
-
Rinse the entire brake and running brake light with 70% isopropyl alcohol or water/soap to remove all debris before application.
-
Dry the brake and running brake light surfaces completely to ensure no dust or residue remains on the surfaces or in the crevices.
- Start with the Side Reflector:
-
Begin either on the Driver's Side or the Passenger's tail light side marker reflector. Align the curved edge facing the quarter panel. The top and bottom edges should meet the black surround of the taillight.
-
Once you have aligned the overlay at the curved edge pointing towards the quarter panel, the rest will fall into place. Except for the end of the tail light overlay that is to be wrapped around the bump and downward towards the white turn signal bar.
- We prefer to lay the top portion of the overlay first, smooth the top part down and then work on the bottom portion where the wrap is supposed to fold to the bottom portion of the tail light. Remember, to lay the overlay with your finger in a left-to-right motion, one section at a time, to prevent bubbles from forming.
For example, if you are working on the top portion, swipe from one side to the other, then slowly move down in the same swiping motion as you inch closer to the bottom portion of the overlay.
- As you get to the edge (the overlay section that is closer to the turn signal), you may need to slightly peel up what you already laid about 1 inch off and use a heat gun to heat the overlay.
- Once you see that edge slightly becoming more malleable, use your finger and pinch the overlay and lay it to your desired placement. Next, use a felt-tip squeegee to lay that edge in one precise swipe, pushing the entire overlay edge down in one go. This method will glass it down and push any air bubbles towards the closest edge in one fell swoop.
-
-
Peel the Quarter Panel Brake Light (running brake light) overlay
-
Align the overlay either at the seam where the reflector starts or at the edge of the light where the trunk crevice starts.
-
Ensure that wherever you lay the overlay, the cutout of the bump fits perfectly around the raised bump. This will help align the overlay properly as you lay it onto the surface.
- The overlay should match the top and bottom lines of the brake light/running brake light just before the black surround. Swipe from one edge to the other edge in a uniform motion (left to right or vice versa), working your way down after aligning the top of the overlay.
- The rest should fall into place once aligned.
- Next, you can decide to add the raised bump tint or not, but if you do... lay the bump overlay tint at the sloped edge first. Ensure it matches the sloped cut-out edge before tacking it down.
- Use a heat gun or blow dryer and heat the raised bump tint about 2-3 inches away until you see the vinyl start to conform to the bump. Use your finger and massage the tint slowly in a uniform fashion to ensure the overlay wraps around the entire bump. Once it is wrapped around completely, it should sit at the cutout line or slightly onto the already installed brake light tint.
-
- Lastly, peel off the inner running brake/running brake light tint that sits on the trunk.
- Once peeled, start at the edge that is either at the trunk crevice or the edge that points towards the logo. Ensure the top and bottom consistently meet the edge of the running brake light throughout the whole lay.
- Once aligned, the rest should fall into place, but adjust as needed. When laying the overlay, start swiping in a right-to-left or vice versa motion. We like to start at the trunk crevice as it is the highest portion of the running brake light, and we swipe horizontally, pushing all bubbles out towards the closest edge and moving downward toward the reverse light section.
- After installing the last piece, follow the next step below for the best adhesion of the overall product.
- Once peeled, start at the edge that is either at the trunk crevice or the edge that points towards the logo. Ensure the top and bottom consistently meet the edge of the running brake light throughout the whole lay.
-
Once everything is laid out to your desired outcome, follow the steps below to ensure longevity and adhesion.
-
Post-heat the vinyl: Use a heat gun or blow dryer to remove small bubbles and activate the adhesive for stronger bonding.
-
If bubbles remain, press firmly with your finger or squeegee and swipe them out toward the closest edge.
-
If you make a mistake, gently peel off the overlay right away and reapply. Add light heat to remove wrinkles.
-
Important: Light Smoke and Dark Smoked overlays include a PET liner that must be removed after installation. Cherry Red and Dark Red may be easier to install with water/soap; however, if you are adept at installing overlays, it may not be needed.
📌 Reminder: Always post-heat the vinyl after installation. This activates the glue and ensures maximum adhesion.
📩 Need Help?
Questions? Contact our support team at:
📧 sales@aeroflowdynamicsoverlays.com
Returns Policy
You may return most new, unopened items within 30 days of delivery for a full refund. We'll also pay the return shipping costs if the return is a result of our error (you received an incorrect or defective item, etc.).
You should expect to receive your refund within four weeks of giving your package to the return shipper, however, in many cases you will receive a refund more quickly. This time period includes the transit time for us to receive your return from the shipper (5 to 10 business days), the time it takes us to process your return once we receive it (3 to 5 business days), and the time it takes your bank to process our refund request (5 to 10 business days).
If you need to return an item, simply login to your account, view the order using the "Complete Orders" link under the My Account menu and click the Return Item(s) button. We'll notify you via e-mail of your refund once we've received and processed the returned item.
Shipping
We can ship to virtually any address in the world. Note that there are restrictions on some products, and some products cannot be shipped to international destinations.
When you place an order, we will estimate shipping and delivery dates for you based on the availability of your items and the shipping options you choose. Depending on the shipping provider you choose, shipping date estimates may appear on the shipping quotes page.
Please also note that the shipping rates for many items we sell are weight-based. The weight of any such item can be found on its detail page. To reflect the policies of the shipping companies we use, all weights will be rounded up to the next full pound.
Related Products
Example product title
- $51.00
- $51.00
- Unit price
- / per
Example product title
- $51.00
- $51.00
- Unit price
- / per
Example product title
- $51.00
- $51.00
- Unit price
- / per
Example product title
- $51.00
- $51.00
- Unit price
- / per
Example product title
- $51.00
- $51.00
- Unit price
- / per
Example product title
- $51.00
- $51.00
- Unit price
- / per
Example product title
- $51.00
- $51.00
- Unit price
- / per
Example product title
- $51.00
- $51.00
- Unit price
- / per
Example product title
- $51.00
- $51.00
- Unit price
- / per
Example product title
- $51.00
- $51.00
- Unit price
- / per
Recently Viewed Products
Example product title
- $51.00
- $51.00
- Unit price
- / per
Example product title
- $51.00
- $51.00
- Unit price
- / per
Example product title
- $51.00
- $51.00
- Unit price
- / per
Example product title
- $51.00
- $51.00
- Unit price
- / per
Example product title
- $51.00
- $51.00
- Unit price
- / per
Example product title
- $51.00
- $51.00
- Unit price
- / per
Example product title
- $51.00
- $51.00
- Unit price
- / per
Example product title
- $51.00
- $51.00
- Unit price
- / per
Example product title
- $51.00
- $51.00
- Unit price
- / per
Example product title
- $51.00
- $51.00
- Unit price
- / per
- Choosing a selection results in a full page refresh.