


- Choosing a selection results in a full page refresh.
Got Questions?
Email us!


Couldn't load pickup availability
Free standard shipping on orders over $25 USA Domestic
Free shipping on orders over $100 for international
You may return most new, unopened items within 30 days of delivery for a full refund. We'll also pay the return shipping costs if the return is a result of our error (you received an incorrect or defective item, etc.).
You should expect to receive your refund within four weeks of giving your package to the return shipper, however, in many cases you will receive a refund more quickly. This time period includes the transit time for us to receive your return from the shipper (5 to 10 business days), the time it takes us to process your return once we receive it (3 to 5 business days), and the time it takes your bank to process our refund request (5 to 10 business days).
If you need to return an item, simply login to your account, view the order using the "Complete Orders" link under the My Account menu and click the Return Item(s) button. We'll notify you via e-mail of your refund once we've received and processed the returned item.
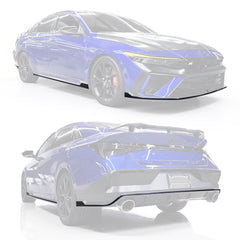
Transform your 2025+ Elantra N with the Pin-stripe Pre-cut Overlay Delete Kit. Replace the standard red with a sleek, satin black for a sporty edge that matches your vehicle’s trim, or choose a bold color that makes your presence impossible to ignore. Designed for quick installation, this kit instantly upgrades your car’s look—professional help recommended for the perfect finish. Make a daring statement on the road by customizing your ride’s style in seconds.
🔧 Specifications:
🛠️How to Install:
For Best Results
Tools Needed: Heat gun or blow dryer, padded glove or felt-tip squeegee
Professional Install recommended - but not required.
Step-by-Step Installation:
Always clean the surface before applying vinyl.
Start from one corner and work your way across.
Use your fingers to press vinyl into place.
If wrinkles appear, lift gently, apply heat, let cool, then reapply.
Firmly press out bubbles toward the nearest edge.
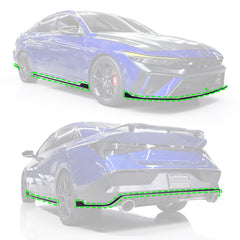
Start at either the kick up (side of bumper) or the front crevice (below the headlight where the 3-part lip begins) Preferably the Kick-up, so you can wrap around the red pinstripe that goes into the wheel well.
Tack the vinyl down on one edge.
Use your free hand to guide and align the pin-stripe with the grooved edges.
Lay the top portion of the pin-stripe first, then press the flat portion down.
Smooth out wrinkles with light heat if needed.
Repeat for the other side.
Start from one crevice and work to the other in a straight line.
Note: The center rectangle area will remain uncovered.
Use heat to mold vinyl around the rectangle’s shape.
Apply the rectangle overlay piece, heating and tucking excess into the black plastic.
The diffuser has 3 sections for easier wrapping.
Start with the kick up portion on either side (same method as front lip).
Alternatively, lay from the crevice outward toward the kick up.
Once both sides are applied, peel and lay the middle strip.
Adjust if needed and use heat to remove bubbles.
Wrap edges securely and trim excess with a light blade cut.
Begin with the kick up area (same method as front lip side).
Use the second stripe in your kit for the straight section.
Start at the rear end of the side skirt (near the quarter panel/rear wheel).
Lay vinyl forward until it slightly overlaps the previously installed kick-up stripe. Take heed to lay the flat portion down first then move toward the bottom of the pin stripe aligning both the top and edges of the overlay to the side skirt pin.
After applying all overlays, heat each section to activate adhesive and improve bond.
Smooth firmly with your fingers to ensure clean adhesion- pushing any bubbles towards the closest edge.
If mistakes occur, peel up immediately, apply heat, wait to COOL and reapply.
📌 Reminder: Always post-heat the vinyl after installation. This activates the glue and ensures maximum adhesion.
📩 Need Help?
Questions? Contact our support team at:
📧 sales@aeroflowdynamicsoverlays.com
You may return most new, unopened items within 30 days of delivery for a full refund. We'll also pay the return shipping costs if the return is a result of our error (you received an incorrect or defective item, etc.).
You should expect to receive your refund within four weeks of giving your package to the return shipper, however, in many cases you will receive a refund more quickly. This time period includes the transit time for us to receive your return from the shipper (5 to 10 business days), the time it takes us to process your return once we receive it (3 to 5 business days), and the time it takes your bank to process our refund request (5 to 10 business days).
If you need to return an item, simply login to your account, view the order using the "Complete Orders" link under the My Account menu and click the Return Item(s) button. We'll notify you via e-mail of your refund once we've received and processed the returned item.
We can ship to virtually any address in the world. Note that there are restrictions on some products, and some products cannot be shipped to international destinations.
When you place an order, we will estimate shipping and delivery dates for you based on the availability of your items and the shipping options you choose. Depending on the shipping provider you choose, shipping date estimates may appear on the shipping quotes page.
Please also note that the shipping rates for many items we sell are weight-based. The weight of any such item can be found on its detail page. To reflect the policies of the shipping companies we use, all weights will be rounded up to the next full pound.
Thanks for subscribing!
This email has been registered!